🏳️ Available as part of SwipedOn Spaces resource booking
How to create a Space
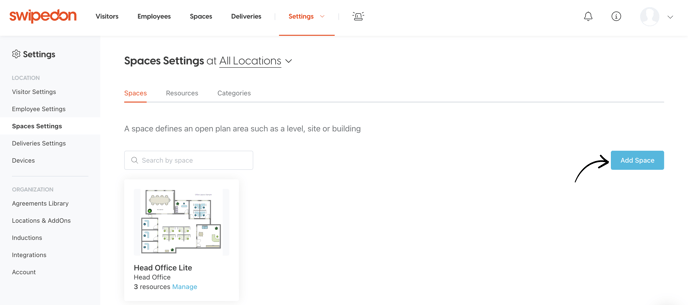
Log in to your SwipedOn web dashboard, and navigate to the 'Settings' > 'Spaces Settings' tab.
-1.png?width=688&height=335&name=Untitled%20(1)-1.png)
Click on the ‘Add Space’ button, which will open up a drawer on the right hand side to create your Space.
 Give your Space a name. [If you have a multi-location account ensure you’re adding the Space to the correct location.] Click ‘Add’.
Hint: Choose a name that would be easily recognisable for your employees to know the location of this space when making a booking.
-1.png?width=688&height=295&name=Untitled%20(2)-1.png)
You will then be able to see the newly created Space under the Spaces tab and can move on to setting up bookable resources within this space.
How to create a bookable resource
To create a bookable resource, navigate to the ‘Settings’ > Spaces Settings tab in your SwipedOn web dashboard. You will be able to see the available spaces at that location and can click on ‘Add’ for the Space you would like to add resources to.
-1.png?width=688&height=295&name=Untitled%20(3)-1.png)
A drawer will pop up on the right hand side where you can enter all the details to set up a resource for booking.
-1.png?width=688&height=333&name=Untitled%20(4)-1.png)
From within this drawer you can select from four default resource categories: Desk, Equipment, Vehicle and Carpark.
You will then need to name the Resource, select which Space within your Location this Resource can be found in and then indicate the capacity of the Resource.
There are preset Features already set against each Resource category to save you time, however you can also enter your own here. You can also add a photo or any relevant notes that would be helpful for employees to know when booking. You can select whether you would like this particular resource to be available to all, or selected employees or departments. Then click ‘Add’.
You can now view all the Resources you’ve set up at this Location in the table on the Resources tab, as seen below.
-1.png?width=688&height=305&name=Untitled%20(5)-1.png)
How to edit a bookable resource
If you have created a resource that now needs changes you can edit this by navigating to ‘Settings’ > ‘Spaces Settings’ > ‘Resources’ tab. In the list view, you will be able to see a table showing all resources available at your location or you can use the ‘Filters’ button to view resources by space, by category, or by features. Once you have found the resource you would like to make changes to, simply click on it and edit any info you need to in the drawer that pops up on the right hand side and 'Save'.
*Note - the only thing you can't edit on an already created resource is the type of resource category it is and the space it is allocated to. If you need to change these you will need to delete the resource and create a new one.
How to add a custom resource category
There are four default resource categories set up in SwipedOn - these are: Desk, Equipment, Carpark and Carpark. If you would like to add your own custom categories to this list you can do so by firstly navigating to the ‘Settings’ > ‘Spaces Settings’ > ‘Categories’ tab. Click on ‘Add Category’.
.png?width=688&height=339&name=Untitled%20(6).png)
You will then be shown a drawer on the right hand side where you can enter the Category name of your choice and select from a number of preset icon options that relate to this resource. Click ‘Add Category’.
.png?width=688&height=338&name=Untitled%20(7).png)
This drawer will then be replaced by one where you can add relevant features to this custom resource and set how many days in advance people can book this particular resource. You will see a green tick and then this feature will appear listed in the drawer for that resource.
.png?width=688&height=337&name=Untitled%20(8).png)